
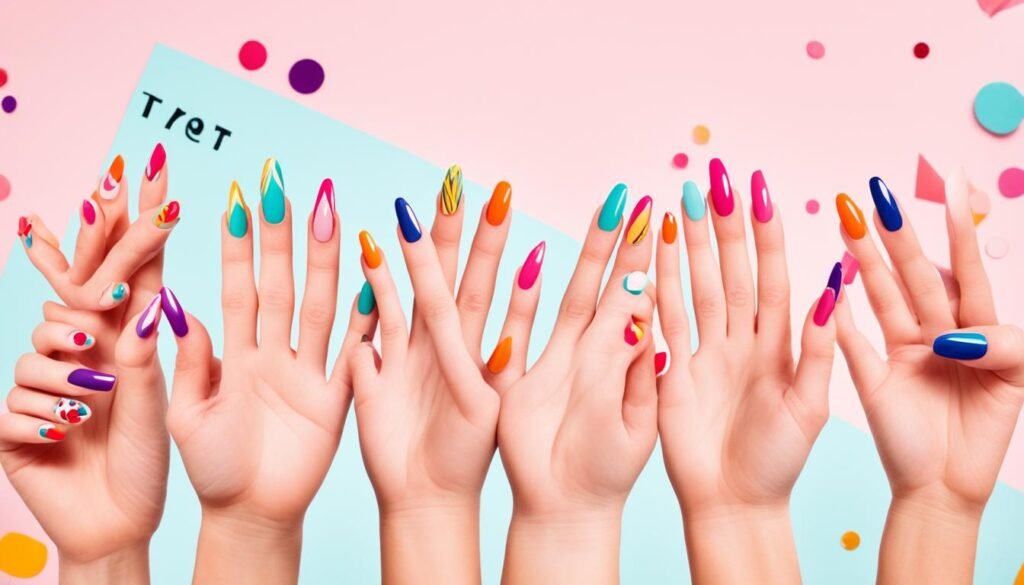
Are you ready to take your manicure game to the next level? Tired of the same old single-color nails? Look no further! In this article, we will dive into the mesmerizing world of nail art tutorials. Whether you’re a beginner or a seasoned enthusiast, these step-by-step guides will provide you with the tools and techniques to create stunning DIY designs at home. Get ready to unleash your creativity and transform your nails into works of art!
From galaxy nails that transport you to outer space, to stylish gold stripe manicures that add a touch of glam, we’ve got it all covered. Discover how to create a wink wink manicure that showcases your unique style or experiment with holographic dot nail art for a dazzling look. Dive into the ombre heart manicure trend and show some love on your nails, or upgrade your classic nude mani with intricate details and designs. And for those who want to add a touch of luxury, we’ll show you how to rock sparkling gold charm nails that will make heads turn.
No matter your skill level or preferred style, these nail art tutorials will provide you with endless inspiration and guidance to achieve the stunning nails you’ve always dreamed of. So, are you ready to embark on a nail art adventure? Let’s get started!
Key Takeaways:
- Unleash your creativity with easy nail art tutorials
- Create stunning DIY designs at home
- Explore a variety of styles and techniques
- Transform your nails into works of art
- Elevate your manicure game with these step-by-step guides
Easy Galaxy Nails
One of the first nail art tutorials you can try at home is the easy galaxy nails. To achieve this stunning look, you’ll need black nail polish, shades of blue and purple, and a touch of silver sparkle. By blending these colors together, you can create a mesmerizing galaxy effect on your nails. It’s a simple yet eye-catching design that will definitely elevate your nail game.
Get ready to take your nail art to the next level with easy galaxy nails. This tutorial will guide you step-by-step through the process of creating a celestial-inspired design that is bound to turn heads. Whether you’re a nail art beginner or a seasoned pro, this tutorial is perfect for anyone looking to add a touch of cosmic beauty to their nails.
Create Your Own Galaxy
Follow these simple steps to create your own easy galaxy nails:
- Start by applying a base coat to protect your nails and provide a smooth surface.
- Apply two coats of black nail polish and let it dry completely.
- Take a small makeup sponge and cut it into a small rectangle.
- On a piece of paper or a disposable surface, apply a few dots of blue and purple nail polish.
- Dab the sponge into the blue and purple shades, slightly overlapping them to create a gradient effect.
- Gently press the sponge onto your nails, focusing on the tips and middle section. Apply more polish to the sponge as needed.
- Repeat steps 4-6 until you achieve the desired galaxy effect. You can add more layers of color to intensify the look.
- Take a thin brush or a toothpick and dip it into silver sparkle nail polish.
- Add small dots or stars to your galaxy nails to mimic the night sky.
- Finish off with a top coat to seal in your design and add shine.
And voila! You now have your very own easy galaxy nails. Show off your cosmic manicure and let the compliments roll in.
“Galaxy nails are a fun and trendy way to add a touch of celestial beauty to your nails. With just a few simple steps, you can create a mesmerizing design that is out of this world.” – Mineral Tones
If you’re looking for nail polish brands that offer a wide range of colors and finishes, check out Mineral Tones (mineraltones.com) and Mineral Sparkle (mineralsparkle.com). They have a variety of shades to choose from, including the perfect black, blue, purple, and silver polishes for your galaxy nails.
Stylish Gold Stripe Manicure
If you’re looking to add a touch of glam to your nail art design, the stylish gold stripe manicure is the perfect choice. With a few simple tools and a little creativity, you can achieve a trendy and eye-catching look.
To create this manicure, you’ll need nail tape in your preferred color and width. Nail tape is a thin strip of adhesive tape that allows you to easily create clean and precise lines on your nails. It comes in a variety of colors, including gold, silver, and other metallic shades, giving you endless possibilities to customize your nails according to your style.
Here’s a step-by-step guide to creating your own stylish gold stripe manicure:
- Clean and prep your nails: Start by cleaning your nails and removing any old polish. Shape and buff your nails to your desired length and shape.
- Apply a base coat: Apply a base coat to protect your nails and ensure long-lasting wear.
- Choose your nail tape: Select nail tape in gold or any other color that complements your desired manicure look. Cut the tape into thin strips using scissors or nail tape cutters.
- Apply the nail tape: Place the nail tape strips on your nails to create your desired design. You can experiment with different patterns, such as straight lines, chevron patterns, or diagonals.
- Seal with top coat: Once you’re satisfied with your design, seal it with a top coat to protect the nail tape and add shine.
- Allow it to dry: Allow your manicure to dry completely before applying any other products or engaging in activities that may damage the design.
With the stylish gold stripe manicure, you can easily achieve a sleek and sophisticated look that is perfect for any occasion. Whether you prefer a subtle gold stripe or a bold and vibrant design, this manicure allows you to showcase your personal style and creativity.
Check out the image below for some inspiration:

Wink Wink Manicure
Nail art is all about expressing yourself, and with the wink wink manicure, you have the freedom to let your creativity shine. This design allows you to choose any pattern or design to draw on your nails, giving you endless possibilities. Whether you want delicate floral patterns or bold geometric shapes, the wink wink manicure lets you showcase your unique style.
But first, let’s define what nail art is. Nail art is a form of self-expression through the decoration of nails. It involves using various techniques, colors, and designs to enhance the appearance of nails. From simple accents to intricate patterns, nail art allows you to transform your nails into miniature canvases.
To achieve a professional and long-lasting finish with your wink wink manicure, don’t forget to seal it all in with a top coat. The top coat acts as a protective layer, preventing your nail art from chipping and extending its lifespan.
Why Choose the Wink Wink Manicure?
The wink wink manicure is a fun and creative way to elevate your nail game. It allows you to break free from traditional manicure designs and create unique looks that reflect your personality. Whether you’re heading to a special event or simply want to add some flair to your everyday style, the wink wink manicure is the perfect choice.
| Benefits of the Wink Wink Manicure | How to Achieve the Wink Wink Manicure |
|---|---|
|
|
So whether you’re a nail art enthusiast or just starting to dabble in the world of nail design, the wink wink manicure is a versatile and exciting option. Let your imagination run wild and create stunning nail art that will turn heads and make a statement.
Holographic Dot Nail Art
If you love all things holographic, then the holographic dot nail art is a must-try for you. This design features dots that create a stunning holographic effect on your nails. For an extra fancy touch, you can even use neon triangles instead of dots. Additionally, you can experiment with different patterns and colors using glitter nail foils. The end result will be a dazzling and unique manicure that will make your nails stand out.
Step-by-Step Guide: Holographic Dot Nail Art
- Clean and prep your nails by removing any old polish and filing them to your desired shape.
- Apply a base coat to protect your natural nails and provide a smooth surface for the nail art.
- Choose your desired holographic nail polish. You can find a wide range of holographic shades online at mineraltones.com or mineralsparkle.com.
- Using the brush from the nail polish bottle, carefully apply small dots onto your nails. Space them out evenly to create a balanced design.
- If you prefer a more intricate design, you can use a dotting tool or a toothpick to create smaller or larger dots.
- For an alternative look, replace the dots with neon triangles. You can achieve this by using a nail art brush and neon nail polishes.
- Once the dots or triangles are dry, seal the design with a top coat to protect and prolong the wear of your manicure.
With holographic dot nail art, you’ll have a trendy and eye-catching manicure that combines the allure of holographic effects with playful designs. It’s a perfect way to express your personal style and add a touch of fun to your nails.
Ombre Heart Manicure
Show some love with the ombre heart manicure. This trendy nail art design is perfect for spring or summer, adding a touch of romance to your look. By using a small and firm brush or a specialized kit, you can easily create a stunning gradient effect with hearts on your nails. Choose your favorite colors and experiment with different combinations to personalize your ombre heart manicure.

Tips for Achieving the Perfect Ombre Heart Manicure:
- Start with clean and prepped nails. Remove any old polish and gently push back your cuticles.
- Apply a base coat to protect your nails and extend the longevity of the manicure.
- Choose two or more complementary shades for the ombre effect. Pastel colors like pinks, purples, and blues work beautifully for a soft and feminine look.
- On a piece of aluminum foil or a palette, drop a small amount of each color you’re using for the ombre.
- Using a small and firm brush, pick up a small amount of the lighter shade and paint the bottom half of your nails. Make sure to create a smooth and even gradient.
- Clean your brush and pick up a small amount of the darker shade. Paint the top half of your nails, slightly overlapping with the lighter shade to create a seamless transition.
- Using the same brush, create small hearts on your nails by carefully dragging the brush to form the outline of a heart shape.
- Allow your nails to dry completely before applying a glossy top coat to seal in the design and add shine.
Now you’re ready to show off your gorgeous ombre heart manicure that is sure to catch everyone’s attention. Spread the love and embrace the beauty of this romantic nail art design!
Classic Nude Mani Upgrade
Take your classic nude manicure to the next level with these three upgrade options. With the help of tip guides, a small brush, or painter’s tape, you can transform a simple nude manicure into a work of art. These techniques allow you to add intricate details, designs, and patterns to your nails, giving your classic nude mani a fresh and updated look.
| Upgrade Option | Description |
|---|---|
| Tip Guides | Using tip guides, you can create perfectly shaped French tips or geometric patterns on your nude nails. Place the guide at the desired angle, apply a contrasting nail polish color, and then remove the guide to reveal clean and precise lines. |
| Small Brush | A small brush allows you to unleash your creativity by hand-painting intricate designs directly on your nude nails. Whether you want to create delicate flowers or abstract patterns, a small brush gives you the precision and control you need. |
| Painter’s Tape | Painter’s tape is a versatile tool for creating clean and bold nail designs. Cut the tape into desired shapes and stick them onto your nude nails. Apply a contrasting nail polish color and peel off the tape to reveal sharp lines and unique designs. |
Whichever option you choose, these upgrades will take your classic nude mani to the next level, making it stand out from the crowd. Get creative and experiment with different techniques to achieve the perfect look for any occasion.
Expert Tip:
Don’t be afraid to mix and match these upgrade options. For example, you can use tip guides to create French tips on some nails and then use a small brush to add intricate designs to the remaining nails. The possibilities are endless!
Elevate your classic nude mani with these upgrade options and let your creativity shine. Whether you prefer a minimalistic design or a bold statement, these techniques will help you achieve the perfect manicure. Explore the world of nail art and enjoy the endless possibilities!
Sparkling Gold Charm Nails
Elevate your nail game with the Gold Nail Charm Kit. This kit provides you with endless options for embellishing your manicure, allowing you to express your creativity and add a touch of glamour to your nails. Whether you prefer a subtle and elegant look or a bold and edgy design, these gold nail charms will take your nail art to the next level.
If you’re looking to achieve a unique and textured effect, why not try the Grunge Glam Studded Nail Tutorial? This tutorial will guide you through the process of creating a stunning grunge glam look using nail studs. The combination of gold accents and grunge elements will give your nails a trendy and eye-catching appearance.
Gold Nail Charm Kit
| Product | Description |
|---|---|
| Gold Nail Charms | A variety of gold nail charms in different shapes and sizes, including stars, hearts, and geometric designs. |
| Nail Glue | A strong adhesive that allows you to securely attach the gold nail charms to your nails. |
| Tweezers | A tool for handling the delicate gold nail charms and placing them precisely on your nails. |
Grunge Glam Studded Nail Tutorial
- Start by applying a base coat to protect your nails.
- Apply your desired nail polish color as a base and allow it to dry completely.
- Using a small dotting tool or toothpick, apply small dots of nail glue where you want to place the gold nail studs.
- Using tweezers, carefully pick up the gold nail studs and place them on the nail glue. Press gently to ensure they adhere well.
- Repeat the process on all the nails, creating unique designs or patterns with the gold nail studs.
- Finish with a top coat to seal the nail studs and add shine to your manicure.
With the Gold Nail Charm Kit and the Grunge Glam Studded Nail Tutorial, you can create stunning nail designs that stand out from the crowd. Whether you’re attending a special event or just want to add a touch of glamour to your everyday look, these gold nail charms will make your nails shine.
Water Marble Sherbet Nails
Indulge in the beauty of pastel sherbet nails created using the water marble technique. This creative nail art method involves swirling different colors together in water and then carefully dipping your nails to create a mesmerizing marble-like effect. The combination of pastel shades gives your nails a soft and dreamy appearance, perfect for the spring or summer season.
With the water marble technique, you have the freedom to experiment with various color combinations and patterns, allowing you to create your own unique and personalized water marble sherbet nails. Whether you prefer a delicate gradient look or bold contrasting designs, the possibilities are endless. Let your creativity flow as you create stunning nail art inspired by the beauty of swirling marble.
To achieve the water marble effect, start by selecting a range of pastel nail polish colors that complement each other. Fill a small bowl or cup with room temperature water and drop the nail polish colors onto the surface. Use a toothpick or a fine dotting tool to gently swirl the colors together, creating unique patterns. Then, carefully dip your prepped nails into the water, allowing the nail polish to adhere to your nails. Once the design is fully transferred, remove your nails from the water and clean up any excess nail polish around your fingers using a cotton swab dipped in nail polish remover. Finish off with a top coat for added shine and longevity.
Discover the art of water marble and embrace the beauty of pastel sherbet nails. Express your creativity and elevate your nail game with this captivating technique. For more nail art inspiration and quality supplies, visit mineraltones.com and mineralsparkle.com. Unleash your inner artist and rock the trend of water marble sherbet nails this season!