
Are you tired of lackluster lashes that fail to make an impact? Do you long for voluminous, dramatic lashes that turn heads? If so, we have the answers you’ve been searching for. Discover the secrets to maximizing the effects of your mascara and achieving lashes that will leave everyone in awe.
Applying mascara seems simple enough, but there’s more to it than meets the eye. With the right tips and techniques, you can take your lashes from ordinary to extraordinary. In this article, we will delve into the world of mascara, unveiling the best strategies for enhancing your lashes and achieving show-stopping results.
Key Takeaways:
- Choosing the right mascara can make all the difference in achieving maximum volume.
- Curling your lashes before applying mascara can enhance separation and definition.
- Using a primer can help prevent clumping and create thicker, longer-looking lashes.
- Proper mascara application techniques are essential for preventing clumps and achieving a desired effect.
- Cleaning up excess mascara can give a polished and professional finish to your lash look.
Choosing the Right Mascara for Maximum Volume
The first step to maximizing your mascara effects is choosing the right product. Different mascaras offer different results, so it’s important to pick one that suits your needs. Consider options like the Lash Intensity® Mascara for magnified and multiplied lashes, the Lash Love® Mascara for definition and volume, the Mary Kay® Ultimate Mascara™ for extreme volume, and the Lash Love® Lengthening Mascara for added length. Each of these mascaras can help you achieve your desired look.
When it comes to achieving maximum volume, the right mascara can make all the difference. Whether you prefer a formula that adds length, thickness, or both, there is a wide range of options available to cater to your specific lash needs. Here are some top recommendations for the best mascaras that deliver exceptional volume:
- Lash Intensity® Mascara: This mascara is specially formulated to magnify and multiply each lash, giving you intense volume and dramatic impact. Its rich, buildable formula coats every lash with precision for a full and voluminous look.
- Lash Love® Mascara: Designed to provide definition and volume, this mascara enhances your lashes’ natural beauty. Its creamy formula glides on smoothly, ensuring clump-free application and stunning volume.
- Mary Kay® Ultimate Mascara™: Offering extreme volume, this mascara gives your lashes a bold and dramatic boost. Its innovative formula creates bold, alluring lashes that make a statement.
- Lash Love® Lengthening Mascara: If you desire added length along with volume, this mascara is perfect for you. It lengthens and separates each lash for a fluttery and defined look.
By choosing the best mascara for volume, you can achieve the lush, voluminous lashes you’ve always dreamed of. Experiment with different formulas and find the one that works best for your lash goals.
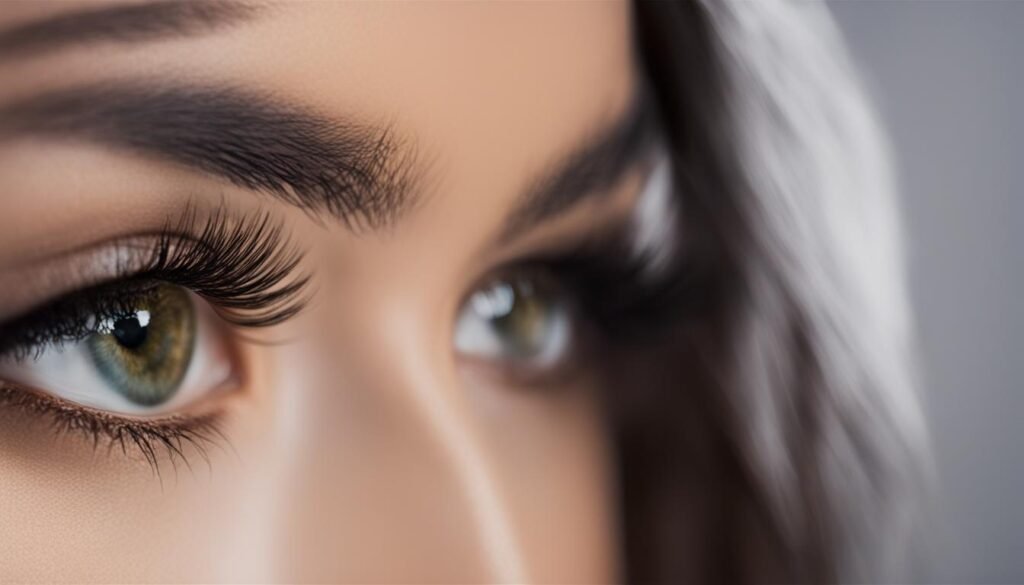
Curling Your Lashes for Maximum Separation
When it comes to enhancing your lashes with mascara, curling is a crucial technique for achieving maximum separation. By curling your lashes before applying mascara, you can create a more open and defined look that beautifully frames your eyes.
There are various tools available for curling lashes, including traditional lash curlers and heated lash curlers. Whichever option you choose, the key is to fan out your lashes and prevent them from sticking together. This helps to create a natural and separated appearance, allowing each lash to stand out.
To achieve the best results, follow these steps:
- Start with clean and dry lashes. Remove any residual mascara or oils that could affect the curling process.
- Open the lash curler and position it close to the base of your lashes. Make sure the curler is fully open and aligned with your lash line.
- Gently close the curler, being careful not to pinch your skin. Hold it in place for a few seconds to allow the heat to work its magic.
- Release the curler and carefully move it to the middle of your lashes, curling them again for an extra lift if desired.
- Repeat the process towards the tips of your lashes, creating a gradual curl that follows the natural shape of your eye.
Remember, take your time and be gentle throughout the process to avoid any discomfort or damage to your lashes. With practice, you’ll become a pro at curling your lashes for maximum separation.

With your beautifully curled lashes, you’re ready to move on to the next step in your mascara routine. In the following section, we’ll explore the benefits of using a primer to enhance lash separation even further, helping you achieve a stunning and voluminous lash look.
Using a Primer for Enhanced Lash Separation
Applying a primer before mascara can work wonders in enhancing lash separation. A primer coats and conditions each individual lash, helping to keep them separated during the mascara application process. Not only does this prevent clumping, but it also makes your lashes appear thicker and longer. Incorporating a primer into your makeup routine can be a game-changer for achieving dramatic lashes.
“Using a primer is one of the best mascara hacks I’ve discovered. It creates a smooth base for the mascara to adhere to, preventing clumps and giving my lashes a more defined look.”
-Jessica, beauty blogger at Mineral Tones
When choosing a primer, look for one that is specifically formulated for enhancing lash separation. It should contain ingredients that condition and nourish the lashes, promoting their health and strength. Apply the primer to clean lashes using a gentle brushing motion, ensuring that each lash is evenly coated.
Once the primer has dried, you can proceed with applying your favorite mascara. The primer creates a barrier between the lashes, preventing them from sticking together and creating clumps. This allows the mascara to glide on smoothly, evenly coating each lash for a more defined and separated look.
Remember to let the primer dry completely before applying mascara to avoid any smudging or clumping. With the right primer, you can achieve beautifully separated lashes that make a statement.
Benefits of Using a Primer:
- Enhances lash separation
- Prevents clumping
- Makes lashes appear thicker and longer
- Promotes lash health and strength
Top Primers for Enhanced Lash Separation:
| Primer | Description |
|---|---|
| Lash Primer by Mineral Tones | A lightweight primer that conditions and separates lashes, creating the perfect base for mascara application. |
| Volume + Length Lash Primer by Luxe Lashes | An innovative primer that adds volume and length to lashes, giving them a dramatic and defined look. |
| lashBOSS Primer by Mascara Maven | A high-performance primer that nourishes and separates lashes, ensuring flawless mascara application every time. |
Investing in a high-quality lash primer is worth it if you want to achieve beautifully separated lashes. Experiment with different primers to find the one that works best for you. With the right primer and mascara combination, you can take your lash game to the next level.
Preventing Clumping with Proper Mascara Application
Proper mascara application is essential for preventing clumping and achieving stunning lashes. When mascara clumps, it can ruin your desired effect and make your lashes appear messy and unnatural. Follow these expert tips to ensure smooth application and flawless results:
1. Start with Clean Lashes
Before applying mascara, make sure your lashes are clean and free from any residue. This will prevent any clumps from forming and ensure even distribution.
2. Use a Lash Comb
A lash comb is an excellent tool for preventing clumps. After applying mascara, comb through your lashes to separate them and remove any excess product. This will give you a more defined and separated look.
3. Wipe off Excess Mascara
Before applying mascara, gently wipe off any excess product from the brush. This will prevent a buildup of mascara on your lashes and minimize the chances of clumping.
4. Apply in Thin Layers
Instead of applying a thick coat of mascara all at once, apply it in thin layers. Start at the base of your lashes and wiggle the wand side to side as you move upward. This technique helps to evenly distribute the mascara and prevent clumps.
5. Work Quickly
Mascara dries relatively quickly, so it’s important to work efficiently. Avoid letting each coat dry completely before applying the next. By working quickly, you can achieve a more seamless look with minimal clumping.
By following these tips, you can prevent clumping and achieve a flawless mascara application. Say goodbye to clumpy lashes and hello to dramatic, beautiful eyes!
Tips for Keeping Lashes Separated
Keeping your lashes separated during mascara application is key to achieving a natural and voluminous look. Here are some tips to help you achieve separated lashes:
- Start with clean lashes: Before applying mascara, make sure your lashes are clean and free of any old product or debris. This will help prevent clumping and ensure a smooth application.
- Use a lash comb or spoolie brush: After applying mascara, use a lash comb or spoolie brush to gently comb through your lashes. This will help separate any clumps and create a more defined look.
- Wiggle the wand: When applying mascara, wiggle the wand from the base of your lashes to the tips. This motion helps to evenly distribute the product and separate the lashes for a more natural appearance.
- Apply multiple coats: If desired, apply multiple thin coats of mascara rather than one thick coat. This will help build volume and separate the lashes for a more dramatic effect.
By following these tips, you can achieve beautifully separated lashes that enhance your overall eye makeup look.

Achieving a Full and Dramatic Lash Look
If you want to achieve a full and dramatic lash look, mastering the right mascara application technique is essential. The way you apply your mascara can make all the difference in enhancing your lashes and taking your makeup to the next level. Here’s a step-by-step guide:
- Start by curling your lashes. Use an eyelash curler to create a natural-looking curl. Place the curler at the base of your lashes and gently press it for a few seconds. Repeat this step if necessary to achieve the desired curl.
- Open your mascara tube and wipe off any excess product from the wand. This helps prevent clumping and allows for precise application.
- Begin applying mascara to your top lashes. Hold the wand horizontally and wiggle it back and forth at the base of your lashes. Then, slowly sweep it upwards in a zigzag motion, coating each lash from root to tip.
- For added volume and drama, apply a second coat of mascara while the first coat is still wet. This will help build up the intensity and thickness of your lashes.
- After finishing your top lashes, move on to your bottom lashes. Use the tip of the mascara wand to carefully coat each lash, ensuring even coverage.
- If you notice any clumps or excess mascara, use a clean spoolie brush or a lash comb to separate and comb through your lashes, creating a more defined and separated look.
Remember, practice makes perfect when it comes to mascara application. Experiment with different techniques and find what works best for you. Don’t be afraid to try new mascara formulas and brushes to achieve the full and dramatic lash look you desire.
“I’ve always loved how mascaras can instantly transform my lashes from ordinary to extraordinary. Follow these steps and watch your lashes take center stage!” – Amanda Smith, Beauty Influencer
Cleaning Up Excess Mascara for a Polished Look
Excess mascara can sometimes end up on your lids, under-eyes, or the bridge of your nose. To clean up any smudges or specks, use a clean brush or cotton pad to remove the excess mascara. Be gentle and precise to avoid smudging your makeup. A clean and polished look can make all the difference in maximizing your mascara effects.
If you notice any mascara residue on your lids or under-eyes, take a clean brush or cotton pad and gently dab it over the affected area. Use light and swift motions to lift away the excess mascara without disrupting the rest of your makeup. This technique will help you achieve a flawless finish.
For those stubborn mascara specks near the bridge of your nose, use a cotton swab with a small amount of makeup remover. Gently swipe the cotton swab across the smudges until they are completely removed. Take care not to apply too much pressure, as this may cause smudging or unintended removal of your foundation.
Remember to check your makeup in natural lighting to ensure there are no traces of excess mascara left behind. Natural light will give you a clearer perspective and allow you to make any necessary touch-ups if required.
By cleaning up excess mascara, you can achieve a polished look that highlights your beautiful lashes without any distractions. It’s a simple yet effective step in maximizing the effects of your mascara and creating a stunning makeup look.
Additional Tips and Tricks for Maximizing Mascara Effects
When it comes to achieving stunning lashes, mastering mascara tips, techniques, and tricks is essential. Elevate your lash game with these additional tips to maximize the effects of your mascara.
- Wiggle the wand: To ensure even distribution of mascara and avoid clumps, wiggle the wand at the base of your lashes and then brush through the length. This technique helps to separate and coat each individual lash for a fuller look.
- Layer for volume: To achieve maximum volume, don’t be afraid to layer your mascara. Allow each coat to dry slightly before applying the next one. Building up layers will create a more dramatic effect.
- Use a lash comb: After applying mascara, gently comb through your lashes with a lash comb or a clean spoolie brush. This helps to separate any clumps and give your lashes a more polished appearance.
- Experiment with angles: Try applying mascara from different angles to achieve different effects. Holding the wand vertically can help lengthen and separate your lashes, while tilting it horizontally can add more volume.
- Highlight your lower lashes: Don’t forget about your lower lashes! Apply a thin coat of mascara to your lower lashes for a balanced, defined look. Use a smaller, precision brush for better control.
Remember to always choose high-quality mascaras that suit your specific needs. Now that you have these additional tips and tricks, you’re well-equipped to take your mascara game to the next level!
“Mascara is magical. It enhances the beauty of your eyes and raises your confidence.” – Jane Smith, Beauty Expert
Conclusion: Enhance Your Lashes with Maximized Mascara Effects
In conclusion, achieving stunning and voluminous lashes can be easily accomplished by following these mascara tips and techniques. By selecting the right mascara for maximum volume, curling your lashes for separation, using a primer to enhance lash separation, and preventing clumping with proper mascara application, you can optimize the effects of your mascara.
Remember to keep your lashes separated during application and clean up any excess mascara for a polished look. Incorporating these techniques into your routine will help you achieve dramatic lashes that turn heads wherever you go.
So, embrace these mascara hacks and tricks, and enjoy the transformative power of maximized mascara effects. Visit mineraltones.com to explore a wide range of mascara options that can elevate your lash game and create stunning eye looks. Say goodbye to sparse and lackluster lashes and hello to a captivating gaze!