
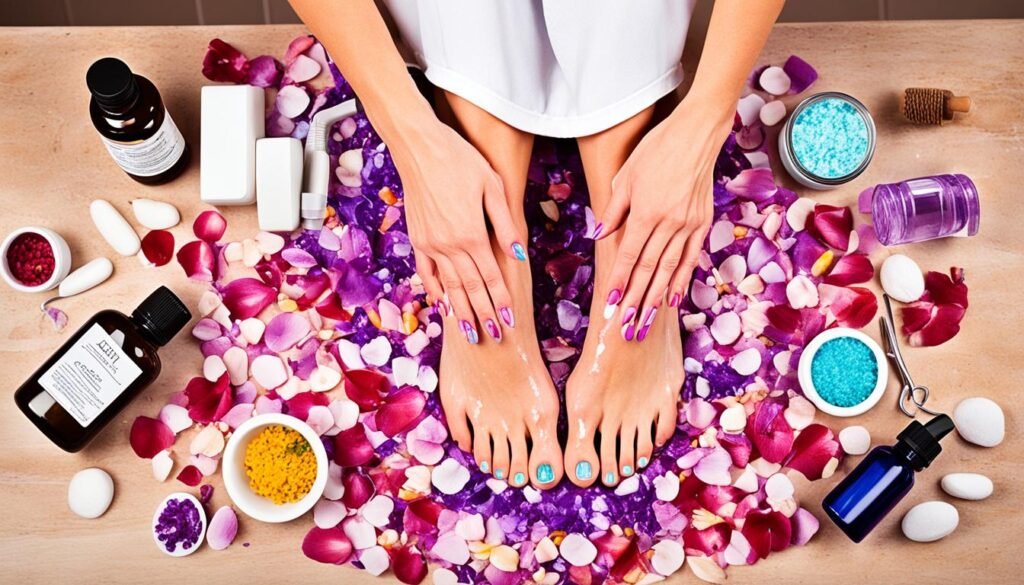
Are you tired of spending a fortune on salon pedicures? Wish you could achieve the same professional results at home? Well, it’s time to put your feet up and get ready to pamper yourself with our DIY pedicure tips and tricks. Say goodbye to expensive salon visits and hello to beautiful and healthy feet right in the comfort of your own home.
Whether you’re looking for at-home pedicure techniques, foot care routines, or pedicure hacks, we’ve got you covered. From self-care tips to the best pedicure tools and nail care techniques, we’ll guide you through every step to help you achieve salon-quality results without breaking the bank. Are you ready to step into the world of DIY spa treatments and master the art of a professional pedicure?
Key Takeaways:
- Learn how to give yourself a salon-quality pedicure at home.
- Discover the importance of a proper pedicure routine for healthy feet.
- Find out how to prepare your feet for a DIY pedicure and achieve the best results.
- Explore the steps for callus removal, cuticle care, exfoliation, and moisturization.
- Get expert tips on nail prep and polish application for long-lasting results.
The Importance of a Proper Pedicure Routine
A proper pedicure routine is essential for maintaining the health and appearance of your feet. Regular foot care routines help prevent common foot problems such as dry skin, cracked heels, and ingrown toenails. Using the right pedicure tools and following professional pedicure steps can ensure that you achieve salon-quality results at home.
Taking care of your feet is not just about aesthetics, but also about overall foot health. Neglecting foot care can lead to discomfort, pain, and even serious conditions. By incorporating a consistent foot care routine into your self-care regimen, you can keep your feet looking and feeling their best.
One of the key aspects of a proper pedicure routine is using the right pedicure tools. High-quality tools can make a significant difference in the outcome of your pedicure. Invest in tools such as nail clippers, a foot file, cuticle pushers, and a pumice stone to achieve professional-grade results.
Additionally, following professional pedicure steps ensures that you cover all the necessary aspects of foot care. These steps typically include trimming and shaping the nails, exfoliating dead skin, removing calluses, moisturizing the feet, and applying nail polish if desired. By adhering to these steps, you can create a comprehensive pedicure routine that addresses all aspects of foot care.
Regular foot care routines, combined with the use of proper pedicure tools and following professional pedicure steps, can help you achieve healthier and more beautiful feet. Whether you decide to visit a salon or create a DIY pedicure experience at home, prioritizing foot care will provide long-lasting benefits for your overall well-being.
In the next section, we will explore how to prepare your feet for a DIY pedicure, ensuring that they are clean and ready for the pampering treatment.
Preparing Your Feet for a DIY Pedicure
Before you begin your DIY pedicure, it’s crucial to properly prepare your feet. By following these essential steps, you can create a clean and smooth canvas for your at-home pampering session.
Step 1: Removing Old Nail Polish
Start by using a gentle nail polish remover to completely remove any old polish from your nails. Ensure every trace of color is gone to achieve a fresh and polished look.
Step 2: Cutting, Filing, and Buffing Your Nails
Trim your nails to the desired length using a nail clipper. Be sure to cut straight across to prevent ingrown toenails. Use a nail file to shape the edges and smooth out any roughness. Next, gently buff the surface of your nails to create an even texture.
Step 3: Washing Your Feet
Thoroughly cleanse your feet with warm water and a mild soap. Pay extra attention to the areas between your toes and around the nails to remove any dirt or bacteria.
Step 4: Soaking Your Feet
Indulge in a relaxing foot bath or basin filled with warm water and a few drops of your favorite essential oil. Soak your feet for about 10-15 minutes to soften the skin and prepare it for exfoliation.
Step 5: Scrubbing and Exfoliating
After soaking, gently scrub your feet using a foot scrub or a homemade exfoliating mixture. Focus on areas that tend to be rough, like the heels and ball of the foot. This step helps remove dead skin cells, revealing softer and smoother feet.
Step 6: Drying Your Feet
Once you’ve completed the exfoliation process, carefully pat your feet dry with a clean towel. Make sure your feet are completely dry before moving on to the next step.

Step 7: Moisturizing Your Feet
Apply a generous amount of moisturizer, focusing on the heels and any other dry areas. Massage the lotion into your skin, allowing it to penetrate and hydrate deeply.
Step 8: Prepping Your Nails
Before applying polish, use a cotton pad soaked in nail polish remover to wipe away any residual oils or moisturizer from the nail bed. This step helps the polish adhere better and ensures longer-lasting results.
Now that your feet are properly prepped, you’re ready to move on to the next steps of your DIY pedicure, which include callus removal, cuticle care, exfoliation, moisturization, and polish application. Stay tuned for more expert tips and tricks!
Callus Removal and Cuticle Care
Removing calluses and taking care of your cuticles are crucial steps in a DIY pedicure. These pedicure hacks and nail care techniques will leave your feet looking and feeling rejuvenated.
First, let’s tackle callus removal. Using a foot file or pumice stone, gently exfoliate and smooth rough areas on your feet. Start by soaking your feet in warm, soapy water for about 10 minutes to soften the skin. Then, using light pressure, move the foot file or pumice stone in circular motions over the callused areas, focusing on the heels and the balls of your feet. Remember not to overdo it, as excessive filing can result in soreness.
Next up is cuticle care. Your cuticles play a vital role in protecting your nails from infections, so it’s essential to keep them healthy. Start by pushing back the cuticles using a cuticle pusher or an orangewood stick. Be gentle and avoid applying too much pressure to prevent damaging the delicate skin. Once the cuticles are pushed back, carefully trim any excess or dry skin using a cuticle clipper or a cuticle nipper. Always remember to disinfect your tools before and after use to maintain cleanliness.
For a visual reference, here’s a handy table summarizing the steps for callus removal and cuticle care:
| Step | Callus Removal | Cuticle Care |
|---|---|---|
| 1 | Soak your feet in warm, soapy water to soften the skin. | Push back the cuticles using a cuticle pusher or an orangewood stick. |
| 2 | Gently exfoliate callused areas with a foot file or pumice stone. | Carefully trim excess or dry cuticle skin with a cuticle clipper or nipper. |
| 3 | Apply a moisturizer or foot cream to keep the skin hydrated. | Disinfect your tools before and after use to maintain cleanliness. |
Remember, proper callus removal and cuticle care are essential for achieving salon-quality results. By following these DIY pedicure tips and using the right pedicure tools, you can pamper your feet and achieve beautiful, healthy nails at home.
Exfoliation and Moisturization
Exfoliating your feet is a crucial step in any foot care routine. It helps remove dead skin cells, revealing smoother and healthier skin. One effective way to exfoliate your feet is by using a foot scrub or even a coffee scrub. These scrubs typically contain ingredients like sugar or coffee grounds, which gently slough off the dead skin cells.
Additionally, exfoliating your feet before a pedicure helps the moisturizing products penetrate deeper into the skin, providing better hydration and nourishment. It also allows your feet to absorb the benefits of the foot care products more effectively.

Following the exfoliation step, moisturizing your feet is essential to keep them soft, smooth, and hydrated. By applying a rich foot cream or using a foot mask, you can provide deep moisturization and create a spa-like experience at home. Look for products containing ingredients like shea butter, coconut oil, or glycerin, as they help replenish moisture and prevent dryness.
Regular exfoliation and moisturization not only enhance the overall look and feel of your feet but also contribute to the health and well-being of your skin. Incorporating these steps into your foot care routine will leave your feet looking beautiful, rejuvenated, and ready to show off in your favorite sandals.
Nail Prep and Polish Application
Before applying polish to your nails, it’s important to properly prepare them. This ensures that your nail polish adheres well, prevents staining, and helps you achieve a flawless finish. Follow these DIY pedicure tips, nail care techniques, and use the right pedicure tools for the best results.
Cleaning and Base Coat
Start by cleaning your nails with a gentle nail polish remover to remove any oils or residue. This step ensures better adhesion of the polish to your nails. After cleaning, apply a base coat to create a smooth surface for the polish. The base coat also helps protect your nails from staining. Choose a base coat specifically formulated for your nail type and concerns.
Applying Nail Polish
When applying nail polish, it’s important to work in thin coats. This allows each layer to dry properly and reduces the risk of smudging or bubbling. Start by applying a thin layer of polish to the center of your nail, then brush it towards the edges. Repeat this process, allowing each layer to dry for a few minutes before applying the next coat. Depending on the opacity of the polish, you may need two to three coats for full coverage. Don’t forget to swipe the brush across the tip of your nail to seal it and prevent chipping.
Finishing Touches
Once your nail polish is dry, apply a top coat to seal in the color and add shine. The top coat not only prolongs the wear of your polish but also provides extra protection against chipping. Choose a top coat with quick-drying properties for a smudge-free finish. Additionally, clean up any excess polish around your nails using a small brush dipped in nail polish remover to achieve a professional-looking manicure.
Now that you know the nail prep and polish application techniques, you’re ready to create beautiful, salon-like pedicures at home. Follow these DIY pedicure tips, nail care techniques, and use the right pedicure tools to achieve fabulous results.
| Pedicure Tools | Description |
|---|---|
| Nail polish remover | Removes oils and residue from nails |
| Base coat | Creates a smooth surface and prevents staining |
| Nail polish | Provides color and coverage |
| Top coat | Seals in the color and adds shine |
| Small brush | Used to clean up excess polish |
Fixing Pedicure Mistakes
Mistakes can happen during a DIY pedicure, but there are easy fixes for them. Whether you color outside the lines or make a small smudge, there’s no need to panic. With a few simple DIY pedicure tips and techniques, you can correct these mistakes and achieve precise and clean-looking polish.
1. Cleaning up the Edges
If you color outside the lines while applying nail polish, don’t worry. To clean up the edges and achieve a neat and professional look, dip a small paint brush into nail polish remover. Gently brush along the edges of your nails to remove any excess polish and create clean lines.
2. Nail Polish Corrector Pens
Nail polish corrector pens are handy tools for fixing small mistakes during a DIY pedicure. These pens are designed with a fine tip and are filled with nail polish remover. Simply use the pen to remove any smudges or unwanted polish from your skin or cuticles. It’s a quick and convenient solution for achieving a flawless finish.
“I always keep a nail polish corrector pen on hand for those little errors that happen while doing my own pedicure. It’s such a lifesaver!” – Sarah, mineraltones.com
By utilizing these DIY pedicure tips and pedicure hacks, you can easily fix any mistakes and ensure your at-home pedicure looks as professional as a salon treatment. Don’t let small errors discourage you – embrace the opportunity to learn and improve your nail care techniques for future DIY pedicures.
Essential Tools for an at-Home Pedicure
Having the right tools is crucial for achieving professional results during your at-home pedicure. By using the appropriate pedicure tools, you can create a relaxing and effective DIY pedicure experience. Here are some essential tools that you should have in your pedicure kit:
| Nail Clippers | Foot Bath or Basin | Foot Scrub |
|---|---|---|
| The right nail clippers will help you trim your nails to the desired length and shape. Look for ones with a sharp and precise cutting edge to ensure a clean cut. | A foot bath or basin is essential for soaking your feet before the pedicure. It softens the skin and helps relax your muscles. | A foot scrub is useful for exfoliating and removing dead skin cells from your feet, leaving them feeling smooth and refreshed. |
| Cuticle Oil | Foot File | Toe Separators |
| Applying cuticle oil nourishes and moisturizes the cuticles, making them easier to push back and trim. It also helps prevent dryness and cracking. | A foot file helps to smooth rough areas on your feet, such as calluses and rough patches. Gently exfoliate your feet to reveal softer and smoother skin. | Toe separators are helpful when applying nail polish. They keep your toes apart, preventing smudging and ensuring even application. |
With these essential tools at hand, you’ll be well-equipped to give yourself a luxurious and spa-like pedicure in the comfort of your own home. Enhance your self-care routine and create beautiful, healthy feet with these must-have pedicure tools.
Final Touches and Long-Lasting Results
After completing your DIY pedicure, it’s crucial to add some final touches to ensure long-lasting results. Applying a top coat is essential for protecting your polish from chipping and extending its lifespan. A high-quality top coat can provide an extra layer of durability and shine, keeping your pedicure looking fresh for weeks. Consider brands like OPI or Essie for reliable top coat options.
Don’t forget to give your cuticles some much-needed attention. Regular moisturization is key to maintaining the health of your nails and preventing dryness. Applying cuticle oil daily helps keep your cuticles hydrated and nourished, promoting strong and healthy nail growth. Look for products like CND SolarOil or Deborah Lippmann cuticle oil for effective moisturization.
As you wrap up your DIY pedicure, remember to incorporate proper nail care techniques. Avoid using your nails as tools to prevent them from breaking or chipping. If you find your nails are weak or prone to breakage, consider using a nail strengthener. Products like Sally Hansen Hard as Nails or Nailtiques Protein Formula can help strengthen your nails over time, giving them the endurance they need.
By adding these final touches and following proper nail care techniques, you can enjoy the results of your DIY pedicure for weeks to come. Remember to stay consistent with moisturization, use a top coat for protection, and incorporate nail strengthening products if needed. With the right approach and the right pedicure tools, you can achieve salon-quality results from the comfort of your own home.